


280ZX Aftermarket Stereo Installation
Putting a different stereo in a 280ZX takes more work than in a newer car. There's no plug-in adapter harness, the factory radio sits in its own console with a large opening around it, and 40-year-old wiring has often been cut into by earlier installers. This page covers getting the factory unit out, mounting a new head unit, the factory wire colors, and your speaker options.
Warning:
Disconnect the negative battery cable before you start. This may look like a simple job, but mistakes happen, and you are responsible for any damage you cause by doing this work yourself.
Keep the Factory Look?
Before you cut anything, decide whether you want to keep the original radio. A stock-looking dash adds value on a clean 280ZX, and the factory unit is often fixable:
- Dead cassette deck? Most of the time it's just rotted belts. See Cassette Deck Refurbishing.
- Faded or peeling faceplates? XenonZcar sells reproduction radio and cassette deck trim.
- Radio needs real repair? We can have your factory radio and deck refurbished by the outside electronics shop we work with. Email us for pricing.
- Want modern features without changing the dash? Leave the factory radio in place and add a hidden Bluetooth receiver or amplifier under the dash or behind a seat, wired to the speakers.
If you do pull the factory radio, keep it, its knobs and its plugs. Someone will want them later, possibly you.
Removing the Factory Radio
The radio, cassette deck and heater controls live in the center stereo console, which comes out as one piece:
- Disconnect the negative battery cable.
- Remove the knee guards under the dash on both sides (two screws each).
- Remove the small panel at the base of the console on each side.
- Remove the four bolts on each side of the console, top and bottom (eight in all).
- Put the shifter in a position that gives the console room (Reverse on a manual, 1 on an automatic) and set the parking brake.
- Slide the console out, unplug the antenna lead, then unplug the radio and deck harnesses.
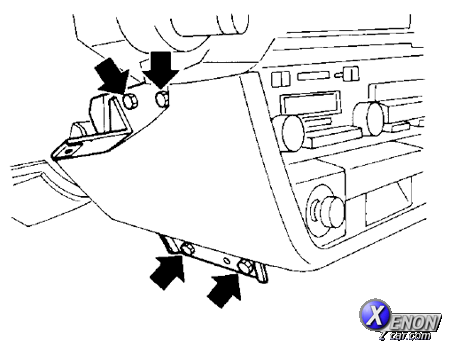
The full step-by-step with photos is on the cassette deck page, and the dash removal page shows the console in the context of the whole dash.
Mounting a Head Unit
Getting a modern head unit to fit securely is the hardest part of the job. The opening in the console is big enough, but nothing is made to hold a single-DIN radio in it, so you'll have to be resourceful if you want a tight, theft-resistant installation. You'll also be left with a large gap around the new unit once the factory radio and deck are gone.
- Mounting plate: a 280ZX radio mounting plate has been sold by Motorsport Auto (The Z Store). Check with them for current availability.
- Custom bezel: many owners make a plate from ABS or aluminum, cut to fit the console opening with a single-DIN cage in it, and cover it in black vinyl or paint it to match.
- Support the back: don't hang the radio from the front plate alone. Use the rear support strap that comes with most head units and bolt it to the console or a dash bracket, or it will rattle and sag.
- Don't cut the console if you can avoid it. Original consoles are getting hard to find, and an uncut one lets you (or the next owner) go back to stock.
Factory Wiring Colors
Note: This information assumes your 280ZX hasn't been altered by "creative" stereo installers or wildlife with a taste for copper wire. Always confirm each wire with a test light or meter before connecting anything.
Reading Nissan Wire Colors
The factory diagrams use letter codes. The first letter is the main color and the second is the stripe, so YB is yellow with a black stripe.
| B Black | W White | R Red | G Green |
| L Blue | Y Yellow | Lg Light green | Br Brown |
Power and Ground
| Function | Wire Color | Notes |
|---|---|---|
| Switched (accessory) 12V+ | YG (yellow/green) per the FSM diagrams; often reported as blue at the radio plug | Feeds both the radio and the deck from the fuse block. Live with the key in ACC or ON. |
| Constant 12V+ (memory) | Red/black | Needed to keep the new radio's presets and clock. If you can't find one, run a fused wire from the fuse block's battery side. |
| Ground | Run a new wire | Bolt it to clean bare metal behind the dash. Most noise and dropout problems come from a poor ground. |
| Illumination | Red/yellow | Live with the parking lamps on. Connect to the new radio's illumination wire. |
| Dimmer | None | The factory radio has no dimmer input. Tap the parking lamp circuit at the headlamp switch if your radio wants one. |
| Power antenna | Check yours | If your car has a power antenna, connect its trigger to the new radio's antenna or remote turn-on lead. |
Speaker Wires
The factory service manual shows two radio setups. With the standard tuner, all four speakers share one yellow/black (YB) negative. With the electronic tuner, the right-side speakers use a blue/black (LB) negative and the left side keeps yellow/black.
| Speaker | Positive (+) | Negative (−), standard tuner | Negative (−), electronic tuner |
|---|---|---|---|
| Front right | LR (blue/red) | YB (yellow/black) | LB (blue/black) |
| Front left | YR (yellow/red) | YB (yellow/black) | YB (yellow/black) |
| Rear right | W (white) | YB (yellow/black) | LB (blue/black) |
| Rear left | LgW (light green/white) | YB (yellow/black) | YB (yellow/black) |
Because the negatives are shared, the factory wiring is fine for a radio with a common-ground output but not for most modern head units, which drive each speaker with its own positive and negative. Connecting a modern radio's separate negatives to a shared factory wire can shut the radio down or damage its amplifier. The safe fix is to run new speaker wire, a separate pair to each speaker, or at least to split the shared negative at each speaker.


See also 280ZX Fuses for the fuse block layout.
Speakers
The speakers matter more than the radio. The factory rear speakers are 5 1/4", and you can't fit anything larger in the rear panels without cutting metal. They don't face the driver or passenger, so you get mostly midrange and some bass, not much treble. You can install any radio you like, but with the factory speakers the difference will be small.
- No cutting: 6 1/2" speakers can be mounted behind the panel, which lets you keep the original grilles.
- 2+2 models: the side "pockets" next to the rear seats can be removed to mount 6x9 speakers. They fit well, but they face upward, so you lose some treble, and being right next to the rear passengers can start a battle over the balance control.
- 6x9s plus satellites: pair 6x9s for bass with small midrange or tweeter speakers on or near the shock towers.
- Custom box: a speaker box in the rear hatch area gives the best sound, at the cost of cargo space.
- Front speakers: add tweeters near the front of the car so the sound isn't all coming from behind you.
Related Pages
Sources Used
- 1979-1983 280ZX Nissan Factory Service Manuals (radio wiring diagrams)