


VG33ET Swap, What it takes to build a Turbo 3.3L VG
As many of you have heard the saying, "there is no substitute for displacement," the VG33E is the largest displacement version of the VG series motors. They are found in the following USDM vehicles:
- '96–'00 Nissan Pathfinder
- '97–'00 Infiniti QX4
- '99–'04 Nissan Frontier, '01–'04 supercharged available
- '99–'02 Nissan Quest & Mercury Villager
- '00–'04 Nissan Xterra, '01–'04 supercharged available
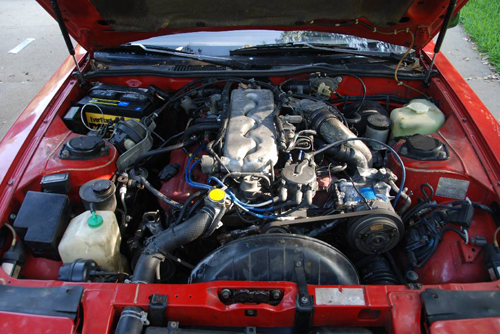
VG33E Basics

The VG33E motors found in these vehicles are nearly identical to a VG30E, except for a few minor external components. Most of the differences are minor: location of components, routing of lines, and electronic details. These can often be worked around by using parts from other VG Series motors.
Basic information, intake manifold down to the heads:
Getting a little more in depth, let’s talk about the intake and fuel related pieces. The VG33E uses the upper intake manifold found on earlier Pathfinders and Quests that used the VG30E. The lower intake manifold is similar to the VG30E’s and you can use most of the 3.0’s upper intake manifolds. The coolant neck on the 3.3’s lower intake houses two sensors; it shares the flange design and bolt pattern with the 3.0, so swapping necks is easy. The fuel system is similar to the later ’87+ 3.0s (side feed injectors), but the 3.3 seals are larger and different. The 3.3’s injectors are poor and difficult to upgrade—junk them if you want high flow.
The 3.3’s lower intake has the injector bolt locations much lower than on the 3.0. It also lacks a sensor and coolant tube on the rear passenger side found on some 3.0s; the rear coolant tube routing is different, but swapping tubes is simple. Port diameters (~36mm), head-to-manifold coolant passages, and bolt patterns all line up with any VG30 head casting.
The 3.3 heads (“OWO” casting) look almost identical to the 3.0’s (13 head bolts), but the main difference is the 10mm exhaust studs, which can be rearranged using a TORX socket to suit your header choice.
Internally, the 3.3 shares rockers, lifters, guides, valve/spring locks, retainers, valve stem diameter, height, and general layout with the 3.0. The 3.3 valves are marked “EF-3”. Valve stem and guide diameters, and seat angles, are the same as the 3.0. Both intake and exhaust ports have a smoother casting than 3.0 V52, 21V, or 85E heads. Head bolt locations, water passages, and oil galleys are very similar (though water passages do differ; avoid 85E/21V heads on a 3.3 block). The 3.3 camshaft (240/244 .354"/.354") is good for low-end torque, but not high-RPM power—many swap to a 3.0 or aftermarket cam. Note the camshaft sprockets: 3.3 uses round tooth, while 3.0 uses square; the crank gear must match!
Basic information, bottom end and rotating assembly:
The 3.3 block (with "OWO" casting on the front driver side) has most 3.0 bracket locations drilled and tapped. The block-to-bellhousing pattern is the same as 3.0, so most transmissions fit. What makes the 3.3 unique is its 91.5mm bore (vs. the 3.0’s 87mm); the stroke is the same at 83mm. The pistons are cast (9:1 compression), with OWO imprint, valve reliefs, and a slight bowl. The connecting rods ("OWO" stamped) are similar to 3.0, with differences in the notches at the bottom. The 3.3 rods are similar to late 3.0 floating pin “W” rods.
The crankshaft is cast and uses the same main and rod journal sizing as the 3.0, as well as the 6-bolt flywheel pattern. The big difference is the snout diameter—the 3.3 must use the matching 3.3 oil pump and pulley. The 3.3 oil pump mounts the filter and pressure sensor, and has a pickup closer to the center line (may require pan mods). Turbo oil feed may be pre-drilled (check your block). Oil filter location: rumor says it won’t clear in a Z31, but with a 1" antisway bar, z31parts.com poly mounts, and intact power steering lines, there’s plenty of room even for a larger filter.
Accessories:
The 3.3’s crank pulley is delicate and prone to damage—use caution! It has a 32mm center bore and belt style/routing varies by model. Easiest solution: keep all original brackets/accessories with the engine, but these may interfere with turbo piping. Option two: swap in a 3.0 crank, 3.0 pulley, and accessories—this requires a 3.0 oil pump (ideally a Quest-style side-mount filter pump), or use the 3.0 filter stud to relocate the filter.
The Swap
In this example, we will be swapping the VG33E crank for the VG30ET crank. This is the easiest way to complete this swap, as the VG33E crank has a larger snout and will only work with the VG33E oil pump and oil pan—which would need fabrication to fit in the Z31. This includes fabricating an oil pump pickup tube and removing part of the oil pan baffle to clear the modified tube. By swapping over to the Z31 VG30E(T) components, you can use the Z31 pan and oil pump as well as the timing gears and pulleys.

Note the size of the crank snout on each of the different crankshafts. OWO has the largest diameter at 32mm, where the A/B and W series have a 28mm snout.
Below you will see the steps in fabricating an oil pump pickup tube from two pickup tubes:


Parts Needed
- Clutch: Makes sense—you’ll have more power than a stock clutch can handle at this point. Much better off doing it while you have easy access.
- Gasket kit: Get a VG33 gasket kit (I got mine from eBay).
- Front main seal for a VG30: The VG33 front main seal won’t fit the VG30 crank.
- Main bearings: You are changing the cranks, of course you need this.
- Rod bearings: Ditto above.
- Assembly lube: You need to make sure you lube all metal-on-metal surfaces on the engine when putting it back together. Use Haynes manual or FSM for locations.
- VG30 Water pump: Must use a VG30 water pump with a VG30 crank.
- VG30 timing belt – Nissan part# 13028-16E85: Must use a timing belt for a VG30 with a VG30 crank. (The belts changed in the 90’s, so make sure you get a belt that matches the year of your parts engine.)
- VG30 timing belt tensioner – Nissan part# 13070-42L00: Replace this while you’re in there, and it also has to match the crank.
- Black RTV sealant: Need this for various places, the oil pan for one thing.
- New spark plugs: NGK Part # 6953 (V-Power Plug #BKR5E11) – SOHC {.039 gap}, ~$2 each at rockauto.com. (Why use old plugs when they only cost $2?)
- Oil filter stud – Nissan Part# 15213-21001: Will need this to install an oil filter, slightly important.
- Oil filter relief valve – Nissan Part# 15241-40F00: Ditto above.
Special Tools Needed
- Pulley puller (you can rent this as well but one way or the other you need access to one of these)
Total costs
The best case for the total cost for this swap will be about $1250 - $1750, But the simple fact is things never go to plan, so real best case number I would put more in the $1500 - $2000 range. Then you have to add anything else you will need on top of the above part to that number. Example, without even adding every little item I have spent over $3000 on my swap to do it right but that included a lot of other stuff non-engine related. So make sure you have the funds to finish what you start! But In the big picture it is a pretty cheap swap, for $1500 to get a nice low mileage engine with more power then stock and just as much reliability is a good deal IMO. Considering that when looking for a stock VG30ET engine they were going for $750 - $1250 for JUST the engine. Parts engines were going a LOT cheaper though FYI.
Tear Down
-
Following the FSM or Haynes manuals, remove your engine from your Z, making sure you label all connections.

- Next, remove the intake and exhaust manifolds from your VG30 and set them aside.
- Remove the distributor and valve covers from the VG30.
- Pull off all accessories that are still attached to the motor.
- Remove the crank pulley, being careful not to damage it. You will be reusing these parts so far.
- Once the crank pulley is off, begin removing the timing belt covers and remove the timing belt and both cam sprockets.
- Pull off the upper timing inner cover and follow the cam removal process in the FSM to remove the VG30 cams.
- Now the fun part: pulling off the crank timing gear. The easiest way is to drill and tap two holes in the face of the gear. You will need to replace it if you do it this way, but it is less likely to damage the crank and oil pump housing.
- Remove the oil pump and pull it off the crank snout and motor.
- Flip the motor and remove the main bearing cap, making sure to mark where each bolt goes. Do the same with the rod caps and nuts.
- Now you can remove the crank from the block.
- Repeat this process with the VG33E motor as well.
Swapping parts
- Once you have both motors torn apart, start by installing new bearings and swapping the crank from the VG30E(T) to the VG33 motor, being careful not to damage or scratch the new bearing surfaces.
- Torque the main bearing bolts to 67–74 ft-lbs.
- Torque the rod cap nuts in two stages. First stage is 10–12 ft-lbs. Second stage: either turn nuts 60–65° more, or, if no angle gauge is available, tighten to 28–33 ft-lbs.
- Install the Z31 oil pump onto the crank and install a new front main seal. Then install a new crank timing sprocket, making sure both keyways are inserted correctly.
-
With the crank done, install the oil pickup from the Z31 and the oil pan from the Z as well.

- With the bottom end done, move on to installing your VG30E(T) cams into the VG33E heads. Installation is the same as removal. Be sure to swap over the distributor hold-down bracket, as the VG33 distributor uses an angled bracket while the Z31 uses a flat bracket.
-
Next, you’ll notice there is no location for the oil filter to screw into on the VG33 motor. Install the oil filter stud and pressure valve into the block at the Z31 filter location. Be sure to use red Loctite when installing the stud into the new block.


- Now, move to the intake (make sure you swap over the thermostat housing before installing the intake, as you can’t reach it after the intake is on). You can use the complete lower/upper intake from the VG30 and move it to the VG33. This way you don’t have to mess with injectors or anything else—it bolts right on.
- The last item that needs modification is the VG30E(T) exhaust manifolds. The VG33E uses 10mm exhaust studs, while the VG30E(T) has 8mm studs. You’ll need to drill out the holes slightly with a 1/2" bit. Be careful—the manifolds are cast and can crack.
- Other than that, it is a bolt-in affair. Install all remaining components from the VG30E(T) motor and install the motor into your Z.
Videos
Here is a video of Texas_Ace's VG33ET on first startup.
Reference Material
- 1996 Pathfinder FSM: Download PDF
Sources Used
- 1984-1988 Nissan 300ZX Factory Service Manual
- VG33 Basics written by: 88sinZ of Z31performance.com
- Swap Information and images by: Texas_Ace