Xenonzcar.com - Z31 VG30E(t) Timing Belt Replacement and 60K Maintainance
Replacing the Z31 timing belt is one of the most important items of maintance you need to do on your Z31. The VG30E an VG30ET motors are interference engines meaning the valves and pistons do share a common space. When the Piston is in the downward motion the intake valve opens and lets air into the cylinder. The Valve then closes and a compression stroke is started. When the piston reaches Top dead center the spark plug fires and the explosion pushes the piston back down. As the piston hits bottom dead center the exhaust valve opens to let the exhaust out of the cylinder. It stays open until the piston just about reaches the top of the stroke and closes so there is no hitting of the valve.
If your timing belt fails the valves will stop opening and closing but the pistions will keep moving and will damage at least 2 valves in the engine. Below are some pictures of the damage that will and cam occur.
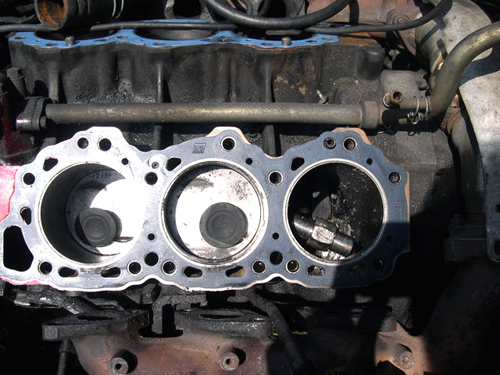
Note the top of the valves laying on the pistons.
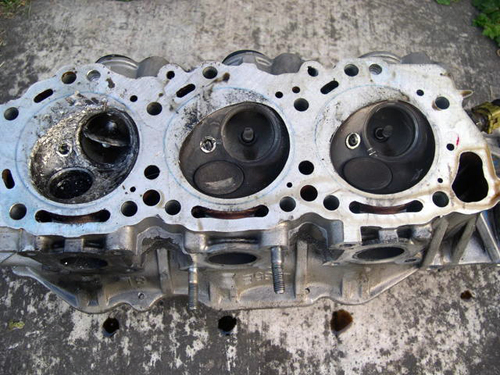
Note the mission valve tops, these were broke off when the pistons hit them.
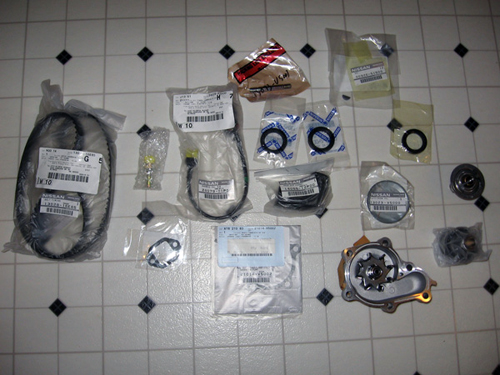
Parts Needed
|
Part
|
Part Number 1984-1986 Non Turbo
|
Part Number
1984-1986 Turbo
|
Part Number
1987-1989 Non Turbo
|
Part Number
1987-1989 Turbo
|
Price for parts
|
|
Belt - Timing |
$31.94
|
||||
|
Belt - Alternator / Water pump |
$8.80 to $13.55 |
||||
|
Belt - A/C Compressor
|
$12.12 to $13.55 |
||||
|
Belt - Power Steering Pump |
$8.63 to $9.36 |
||||
|
Timing Belt Tensioner |
$60.11 |
||||
|
Tensioner Stud |
$1.73 |
||||
|
Tensioner Spring |
$1.80 |
||||
|
Tensioner Washer |
$2.12 |
||||
|
Tensioner Lock Washer |
$0.83 |
||||
|
Tensioner Nut |
$0.58 |
||||
|
Seal - Camshaft (2 needed) |
$4.15 |
||||
|
Seal - Crankshaft |
$4.25 |
||||
|
CHTS - Cylinder Head Temperature Sensor |
$27.16 |
||||
|
CHTS - Subharness |
$16.10 |
||||
|
Crankshaft Front Sprocket Plate |
$2.58 |
||||
|
Crankshaft Rear Sprocket Plate |
$1.64 |
||||
|
Crankshaft Timing Gear |
$28.04 |
||||
|
Hose - Bypass |
$16.10 |
||||
|
Hose - Lower Radiator |
$14.55 |
||||
|
Hose - Upper Radiator - Front |
$24.48 |
||||
|
Hose - Upper Radiator - Rear |
$21.04 |
||||
|
Part
|
Engine type A/B Series
|
Engine Type W-Series
|
Price
|
Notes
|
|
|
Waterpump |
$80.20 to $100 |
|
|||
|
Gasket - Waterpump |
N/A
|
$3.83 |
Check Waterpump box before ordering.
RTV sealant used on W-Series
|
||
|
Thermostat |
$14.98 to $18.24 |
|
|||
|
Gasket - Thermostat Housing |
N/A
|
$3.57 |
RTV sealant used on W-Series |
||
|
Woodruff key |
$0.82 |
2 needed on W-Series
|
|||
Or you can purchase the Timing belt kit part number Z31-TBKITA1 from Courtesy Nissan but it does not include everything listed above.
Tools Needed
- Pulley puller
- Seal puller (not necessary)
- Allen wrench set
- White paint pen
- Pry bar
- Air impact wrench and impact sockets (makes certain steps much simpler, must for automatic),
- 27 mm socket
- Torque wrench
- RTV silicone
- Various Metric Sockets
- Ratchet
- Extensions
The Tear Down
- Remove lower engine shield usually missing from most of the Z31s I have seen.
- Next is the Cooling fan to do this remove the four nuts holding it to the water pump pulley. Be careful as not to drop them.
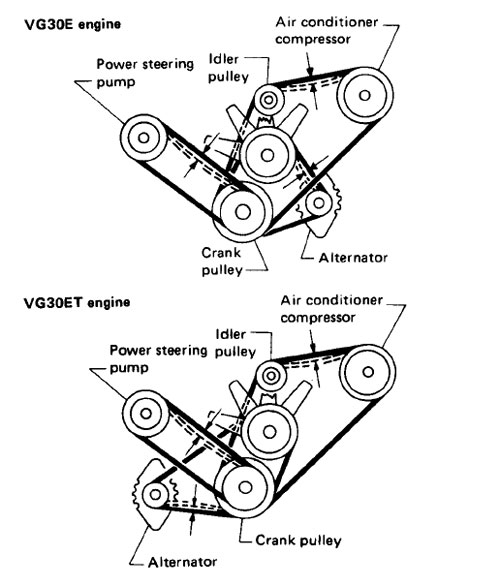
- Now remove the Fan shroud and all engine belts.
- Now on to the crankshaft pulley this is held on by the 23mm Bolt. on a manual transmission model put the car in 5th gear and set the parking brake. Then brake this bolt lose. On an automatic an Air Impact gun will be needed. Reinstall the bolt without the pulley so you can rotate the motor to align the timing marks.
- On to the A/C idler pulley this held on by a few bolts on each end
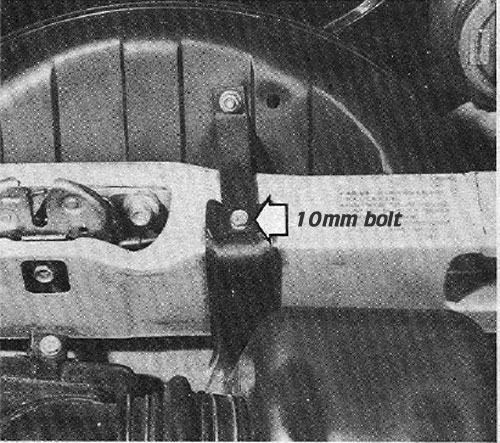
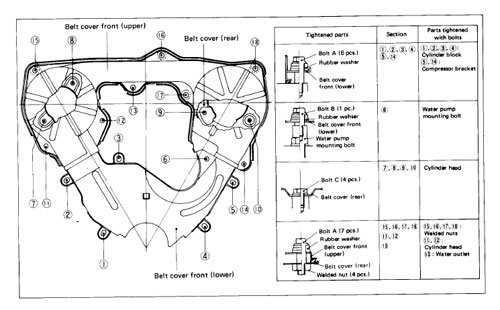
- Next is the timing belt covers. The upper one is first by removing the many 8mm bolts. Once this is off then the lower one can be removed in the same way.
- Now you may want to remove the spark plugs to make it easier to turn the motor to align the timing marks.
- Once the motor is aligned, mark the location on the old belt and pulleys.

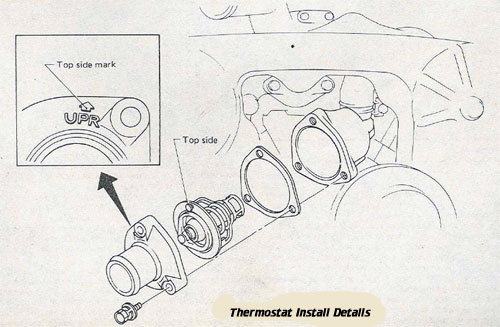
- Now you can remove the old thermostat and water pump and replace them. You will want to do this with the old belt in place as you will spill coolant and it can damage the new timing belt if it is installed before hand.
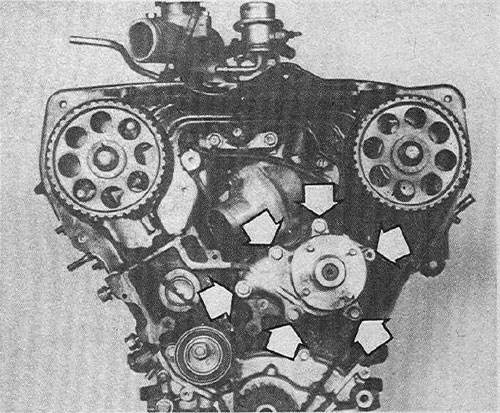
- Once the water pump and thermostat are replaced you need to decide if you will be replacing the oil seals.
- If you are replacing the Oil seals, Hold the cam sprockets still and unbolt them, remove the sprockets and replace the cam seals. Remove the seals by carefully bending the outside ring with a punch or screwdriver. DO NOT scratch the camshaft or outer sealing surface. Just barely dent the seal enough to get a screwdriver over the top & be able to pry down a little bit to pop it out. I can not stress enough how important it is to NOT scratch any of the mating surfaces. Scratching the cam will lead to VERY EXPENSIVE repairs because the seal will leak oil out into the timing belt area. Not something I care to think about. If a seal puller is available, it can be used on the intake cam seals, they don't seal to the camshafts, so the puller can be inserted and used.

- Natrally, replace the sprockets and torque to specs. It is easiest to place the car in 5th gear, with the old belt on and simply unbolt the cam pulleys. Only break the bolts lose, then remove the pulleys and belt at the same time. When torqueing the pulley bolts, put the old belt on to avoid stressing the new one. If you have an automatic or if the engine is out of the car, you'd better have air tools, or do it this way: Cut the old belt into one long piece. Wrap it around the cam pulley and hold the pulley with a chain wrench, removing the bolt with a wrench. Do the same when reinstalling the cam pulleys.
- There are no lips behind the cam seals, so if you tap them in too far, they will just pop inside the heads, requiring lots of disassembly to remove. Tap the right(passenger)) side seal until it is flush with the metal surface or slightly below(no more than a couple mm), and the left(driver) side seal until it is flush with the smallest diameter of the taper, you'll know what I mean when you take it apart and look at it.
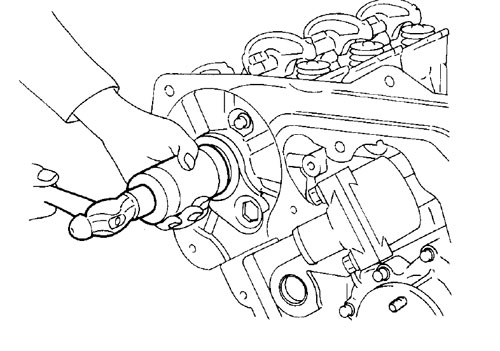
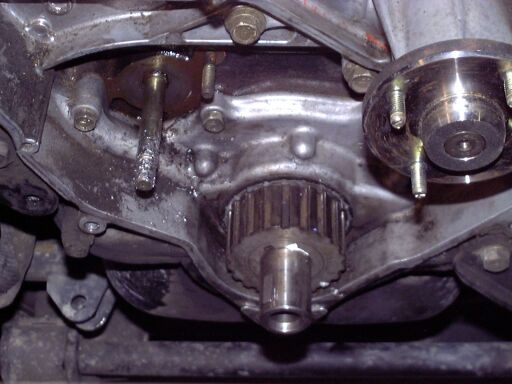
- Once again loosen the crank pulley bolt (1 x 27 mm). Make sure to use a real penetrating lubricant beforehand (PB Blaster).An air wrench makes this much easier. Pry the crank sprocket off the crank, it will be very tight, you will probably have to destroy the thin metal guide plate behind the sprocket, but you will replace it with the new one you special ordered from Nissan. Replace the seal, and install the new metal plate, the NEW sprocket key or keys, and the sprocket with anti-sieze compound on the inside of it. Do not, under any circumstances, hammer a prying device behind the sprocket or you may break the oil pump housing, which is bad. What I do as I replace the sproket anyway is to drill and tap two holes in the crankshaft timing sproket. then you can use a wheel puller to pull the sproket off without damaging the oil pump housing or crankshaft in any way.
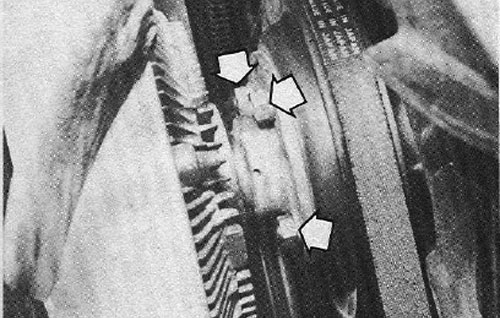
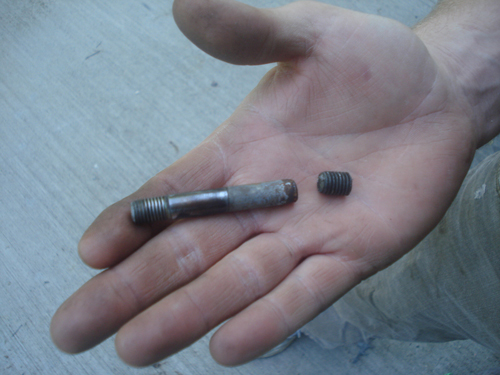
- Relieve tension on the Timing belt tensioner and then procede to remove the old belt. Now it is time to replace tensioner and the tensioner stud. Otherwise this can happen and do the damage above.
- Installing the new belt with the marks on the belt directly adjacent to the marks on the pulleys, noting that new belt has a front and rear facing edge. You must be absolutely sure you put the belt on right or your engine will be destroyed when you start it, no second chances, get it right!
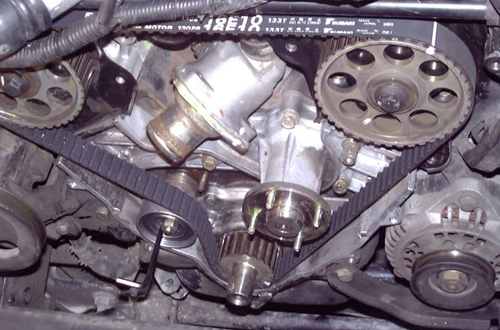
What it looks like on the real motor - Turn the engine over by hand a few times to ensure that nothing interferes. (Note: After you turn the engine over, it takes a few thousand revolutions until the marks on belt and pulleys line up again, do not worry if you are absolutely sure of the timing. If you have any doubts at all, go back to step 3.)
- Adjust the belt tension according to the shop manual. This may take a few tries, but take your time. The tension has a large impact on belt life. Torque the lock nut to the correct spec listed below.
- Replace all removed Items, and start engine.(replace the 2 inch water hose between the thermostat housing and metal coolant pipe right behind the fan now, they have a very, very bad habit of leaking)
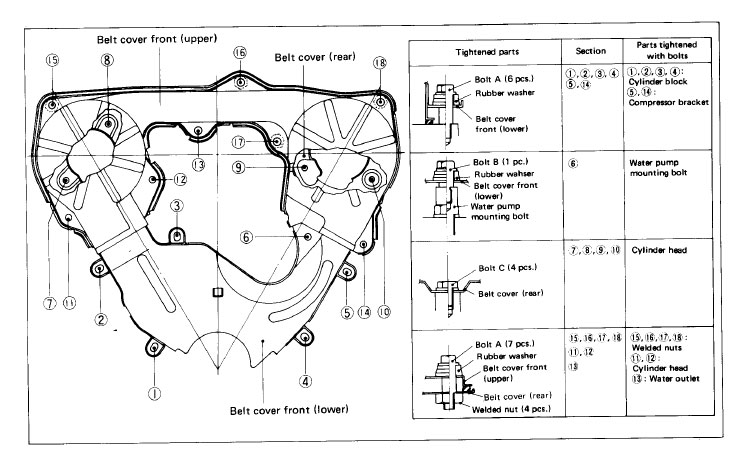
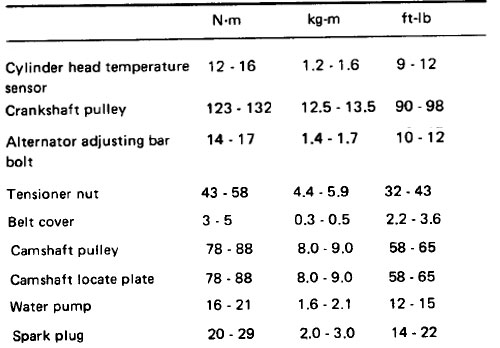
Torque Specs