
XenonZcar.com - Z31 Headlamp issues and the fix for them
If you have a head lamp that flickers or has gone out all together you'll have to determine whether it's the lamp, socket or switch in the steering wheel column. Remove the lamp from the frame and inspect the socket and head light spade terminals for corrosion. If it the socket is corroded best thing to do is to get a replacement from Nissan or the auto parts store. They're only a few bucks. Don't fool around.
If the socket and lamp pins look good check the continuity of the lamp. Using an ohm meter, the three pins should have under 1ohm resistance in any combination. Obviously, if the lamp has no continuity in any one or more combinations it's bad. If you don't have a meter, carefully jumper the lamp to a battery to check the high and low beams. If the Lamp checks out ok, turn the head light switch on including the high beams and check for 12 volts dc at the socket. Two pins should have 12vdc and one will be 0v. If you have an ohm meter check continuity of the 0 volt contact to chassis ground. It should be 0 ohms.
Now, if the lamp is good, there is 12vdc to the socket and good ground continuity, two things remain as the possible cause. The switch in the steering wheel column or the "mechanical" contact between the socket and the lamp. Check the socket first since you are likely to have it out at this point. Commonly the female spade terminals in the socket loosens and makes contact intermittently. Looking into the socket you can see the end of the spade terminal. Also you can see a narrow space along side the terminal. Slip a small screw driver down the space and pry against the connector to close the gap in it. Don't close it all the way. Close it enough to get a good tight grip on the lamps spade terminals. This should restore the normal function of the intermittent head lamp.
If you still don't have 12vdc at the socket the only thing left is the steering column switch. The switch doesn't cost a lot and I recommend replacing it. You can also clean the contacts but this may or may not be a lasting fix. It's your call. You will need a steering wheel puller. A cheap one will do. Remove the horn fuse and then take off the rubber horn cover. Loosen the large steering wheel nut and back it off one or two turns but don't take it off. Set up the puller and start cranking away. The puller will get quite tight before the wheel lets loose. It will let go with a violent bang so be prepared! Once it's loose, take the puller off and remove the nut. Pull the wheel off and grab the washer as you do or it will slip inside the wheel assembly where it may be difficult to retrieve. You should now see the headlight switch. Clean it or replace it.
Here are some common problems and fixes:
Video
Intermittent interior lighting and exterior marker lighting failures.
Symptom:
Occasional burning smell. Fuses all look good.
Reason:
Corrosion on light switch connector #12 causing poor connectivity and overheating.


Action Taken:
Cleaned plug male connector with fine grit sandpaper.
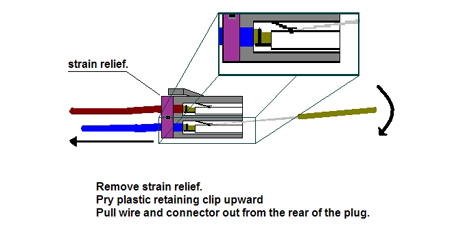
Harness female connector was beyond repair and further damaged trying to extract it from the plug.
The female connector was cut off and the wire was cutback and stripped.
A new female connector was soldered in place.
These connectors can be replaced with a little effort, instead of using a crappy after market crimp connector.
Artists rendering of connector replacement:
Intermittent Headlight failure:
Symptom:
One or Both headlights do not operate properly. Fuses all look good.
Reason:
Corrosion buildup on light switch contacts causing weak or no connectivity. Contact fingers warped from overheating.
Tools Needed:
- 19mm socket with extension and ratchet
- Phillips screwdriver
- Wire stripper/cutter
- Soldering iron
- Xacto blade
- Metal pin
- Fine grit sandpaper
Action Taken:
Cleaned contact points with fine grit sandpaper to remove corrosion. Carefully re-adjust contact fingers.
After a few years, this started giving me intermittent failures. I cleaned and re-adjusted it twice before I sought out a replacement at the junkyard. Some owners have good luck with cleaning them, for others its more temporary solution.
When cleaning the contacts, use fine grit sandpaper. Try not to remove too much material or you may need to readjust the contact fingers.
Re-adjusting them is a hit or miss affair and i would try to avoid the trial and error, which is why i got a replacement after two temporary fixes.
Clean both the upper and lower contact surfaces. Blow out any excess debris.

Contacts labeled for what they control Below

Accessing the combo switches
- First you want to remove the steering wheel column covers. To do this, there are 4 Phillips head screws that hold this all together. The outer two hold the halves together and the inner two hold the cover to the combo switch. Now remove the key light connector and the cover will be free. Be careful not to crack the cover when pulling the lower half over the cruise control switch on GL models.
- Now you can pry the horn cover off the steering wheel with your hands. Start at the top and pull. You will now see the 19mm nut that holds the wheel to the shaft. Remove this nut and use a steering wheel puller to remove the wheel. Another way to remove this without the puller is to loosen this nut but leave it on about 3 turns. Now shake the wheel side to side and top to bottom. It will come loose and the nut is still there to keep the wheel from hitting yourself in the face with it.
- Next disconnect harness from back of cluster combo switches. Once all this is done locate the single Phillips head screw holding column switches in place and loosen until almost out. Disconnect the connectors and remove switches off the shaft. You are now done on the lower driver side.
Rebuilding 1988-1989 Switches with new contacts
As many know, the 1988-89 300ZX headlight switch assembly differs from the 1984-87 switch, primarily in that the connectors on the 88-89 switch differ from the 84-87 switch, the turn signal cancelling mechanism is different between the two and, more to the point, the 88-89 switch is no longer available from Nissan and not available from the after-market.
I did some research and have confirmed that the switch contacts body (self contained) is the exact same between the 1989 Nissan 240SX and the 88-89 300ZX.
You are going to buy a complete, new, 1989 240SX headlight switch assy and remove the switch pack from it and transplant it over to the 88-89 headlamp switch.
First off, here's a pic of the back of the 88-89 headlight switch showing the connectors:

Here's a couple of pics showing the 1989 240SX switch (front, side/signal cancelling, back with connectors):


Here's a side-by-side of the switch packs out of the 240SX (left) and 300ZX (right) - identical:


Part Numbers
| Brand | Part Number | Cost |
| The OEM Nissan 1989 240SX switch | 25540-44F00 | $132.63 (list) |
| Duralast - Niles made switch like OEM | SW2023 | Autozone ~ $50.00 |
| Standard Motor Products | DS549 | Rock Auto ~ $46.99 |
| Airtex/Wells | 1S1888 | Rock Auto ~ $56.79 |
Process:
You will remove the two main body retaining screws , plus the stalk wire harness retaining clip screw, from the back of the old switch. You must now try and very carefully pry the switch pack from the switch housing as there are five slots with retaining tabs. On an old switch with brittle plastic you may break the black switch body housing but don't panic; the two long switch pack retaining screws will secure the switch pack into the switch housing securely.
You may want to clean out some of the old grease from your old switch but that is not %100 necessary.
Here are some pics of inside the switch housing bodies where the mechanism activates the proper contacts for various lighting operations:

In closing, I verified operation of the 1989 240SX switch pack in a 1988 300zx where the headlight switch had failed and it performed like new.
This is a significant (and inexpensive) find for the do-it-yourselfer.
Sources used on this page:
- Article and Images by ZKarma
- Video by:Christien Veilleux
- 1988-1989 Switch Rebuild info and pictures by Greg Balsley