
XenonZcar.com - Z31 Dashboard Removal
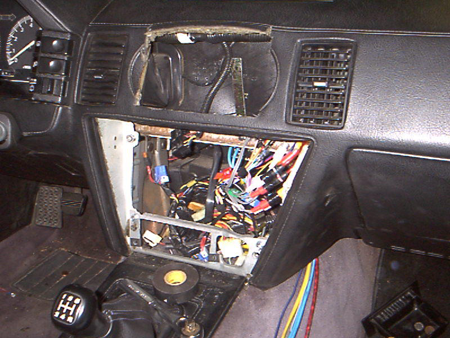
When I had to replace my heater core as it was leaking, I learned that I would need to remove the dashboard. I thought to my self this will take forever but it was not that hard to do and only took about one hour. Below is the steps I took to pull the dash.
Click to Enlarge
Tools Needed
- Regular 10mm socket
- 19mm socket
- Socket driver or Ratchet
- 3" long extension
- #2 Phillips screwdriver
- #3 Phillips screwdriver
- 2 Small flathead screwdrivers
- Steering wheel puller
Process
- The first step is to remove the stereo and heater control assembly. To do this remove the ashtray by pulling it out. Then remove 4 stereo/climate control trim screws. Two are located where the ashtray covered the panel. The other two are on top and are black in color. You can use a 10mm socket to get these out if they are tight. Now pull trim out, disconnect cigarette lighter and ash tray lights, and remove trim. Once this is done, remove 4 stereo/climate control mounting screws. These are also 10mm. now you can pull stereo and climate control assembly out in one piece. Disconnect the connectors, and remove entire assembly from the car. At this point you should be able to see the 4 screws holding dash to mounting plates. Remove these as well and you can move on to the Driver side lower dash cover.
- To remove the Driver side lower dash cover remove the three screws holding it to the dash. Pull the trim piece down and disconnect foot light. Next unplug driver's side dash harness and remove driver's side lower dash retaining screw. If you have a digital dash remove nut and bolt holding power supply, unplug and remove the power supply.
- Now on to the steering wheel that now is in the way. First you want to remove the steering wheel column covers. To do this, there are 4 Phillips head screws that hold this all together. The outer two hold the halves together and the inner two hold the cover to the combo switch. Now remove the key light connector and the cover will be free. Be careful not to crack the cover when pulling the lower half over the cruise control switch on GL models.
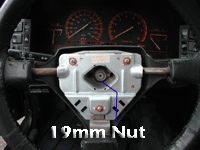
- Now you can pry the horn cover off the steering wheel with your hands. On GL models start at the top and pull. On GLL models pry at the bottom. You will now see the 19mm nut that holds the wheel to the shaft. Remove this nut and use a steering wheel puller to remove the wheel. Another way to remove this without the puller is to loosen this nut but leave it on about 3 turns. Now shake the wheel side to side and top to bottom. It will come loose and the nut is still there to keep the wheel from hitting yourself in the face with it.
- Now disconnect harness from back of cluster combo switches. Once all this is done locate the single Phillips head screw holding column switches in place and loosen until almost out. Disconnect the connectors and remove switches off the shaft. You are now done on the lower driver side.
- Next remove passenger side lower dash cover. Once again remove the 2 screws at the bottom of the panel. Pull the trim piece down and disconnect foot light. Now you can remove plastic clip and screw to remove passenger kick panel to gain access to dash harness connectors. Disconnect passenger side dash harness connectors at this time. Now remove the lower dash bolt on this side. Once again it is a 10mm.
- Now let’s remove upper dash windshield vents to gain access to the last of the bolts holding the dash in place. (See diagram below) Starting from one side, use a small screwdriver to push the metal tabs in the vents forward and the use another screwdriver to pry the vent up slightly. Repeat this all the way to the other end using the bigger screwdriver to keep the vent from popping back into place. Now you can remove the four screws across the top of the dash with your 10mm socket and ratchet. Be careful not to hit your windshield to hard or you will crack it.
- Now the dash should be free. Carefully pull dash out and away from steering column making sure you didn't miss any connectors. Remember if you have an 84-86 analog dash, be sure to disconnect the speedometer cable from the back of the instrument cluster BEFORE you attempt to pull the dash out. If you don’t the clip will brake and it will be almost impossible to get the cable back in place on the cluster and a new cable will be needed.