
XenonZcar.com - Cassette deck refurbishing in your 280ZX
Has the cassette deck in your 280ZX gone kaput? Have no fear, you just very well may be able to fix it yourself! It's both my understanding and personal experience that about 75% of the time, your "bad deck" is only bad due to rotted/broken/melted belts. This is an easy fix! Sorry for the lack of photos aside from the 2 at the end, but hopefully these instructions are detailed enough to figure it out.
Note: These instructions are based on a 1982 280ZX Turbo coupe
Note: Before doing any electrical work on your car, it's always safe to remove the negative cable from your car battery.
STEREO CONSOLE REMOVAL
- Start by dropping the knee guards under the dash on both the driver and passenger sides. Each knee guard is held by two (2) screws
- Unscrew the two (2), small panels at the base of the stereo console. There should be one on each side (driver and passenger).
- Now there should be four (4) bolts revealed on each side at the top and bottom of the stereo console. Unbolt each set of four bolts on each side.
- Make sure your parking break is engaged (or you have some blocks behind the wheels) and move the Auto shifter all the way down to 1st gear. On manual put the Shifter in the Reverse location.
- Now you should be able to slide the entire stereo console out. Careful with the cables, there is one you have to remove (I believe it's the antenna cable) to take the stereo console out further. Your stereo should remained attached to a large cable the entire time, there is no need to remove this.
- Now you can see how the cassette deck is attached both to the console itself and to the stereo (AM/FM receiver). You should be able to easily remove the larger, beige cable from the receiver, but there is one single blue cable that may be difficult to remove. If you cannot successfully remove it at its connectors, it is safe to cut the cable. I reattached the two ends with your standard electrical cable twisty-together-thing that you often find behind a light switch.
- Remove the screws holding the cassette deck to the stereo console and take the cassette deck out from the console
CASSETTE BELT REPLACEMENT
Now that you have your cassette deck out of the stereo console, it's time to open it up and replace those bad belts!
- There are several screws holding the top cover/plate onto the cassette deck that you need to remove. Careful with these screws as mine were especially tight and I ended up stripping a few of them, yet managed to get them out.
- Now remove the face plate, there should be 3 screws holding it on.
- Next, remove the bottom plate which will expose where the belts are located.
- There is a metal plate on top of the two large wheels that is held on by two (2), small screws. Unscrew the plate so you have easy access to all of the belts.
Here is a photo with the plate unscrewed and the belts removed.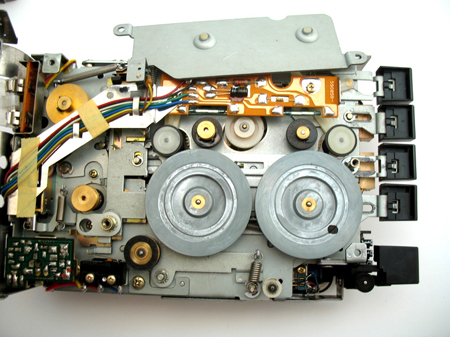
- If your belts are anything like mine, they are in pretty bad shape. One of my belts were completely mush and the others were stretched and on their way out and one was broken. Now it's time to order some new belts! There are five (5) belts total. I ordered my belts from [www.studiosoundelectronics.com]. They came in a few days and work perfect! The belts you'll want to order are SQUARE BELTS and I list the sizes and product number below.
Here is a diagram of the where each belt goes and what size each belt is. The belts that fade from a solid color to transparent are connected to points unseen.
- RED - 4.0in x 1.2mm (SBS4.0)
- GREEN - 12.4in x 1.2mm (SBS12.4)
- BLUE - 6.0 x 1mm (SBO6.0)
- PURPLE - 4.6 x 1.2mm (SBS4.6)
- YELLOW - 3.2 x 1mm (SBO3.2)
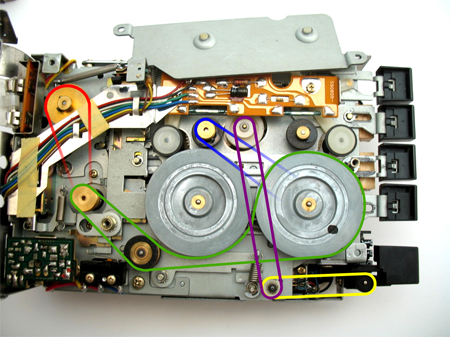
The GREEN belt seemed to be a little loose to me, yet it fits around, just not as tight at the other belts and it seems to work fine. These are the belts that worked for me, and I am sure they will work for you too! They are inexpensive (around a dollar each) and came pretty quickly
After replacing the belts, simply follow the above instructions in reverse and you should be good to go!
Sources used on this page:
- Written by: maalsa of Zcar.com